
In this recording of Madrax's Bike Room Design Made Easy For Developers and Facility Managers webinar, we discuss the benefits of a bike room, provide some tips on how to plan out the perfect storage space, and show off our Bike Room Builder, which you can use to make the process easier. It was originally recorded on May 10th, 2023.
Host: Ryan Colwell
Facilitator: Chantel Pivotto
Panelists: Stacy Haldeman, Larry Seiple
The Importance Of A Bike Room
Before we begin planning out a bike room, it is important to understand why it's worth the time and effort in the first place.
In general, a bike room benefits the patrons, tenants, and facility manager of a property by creating a safe and secure area where people can store their bikes in for long periods of time. While street-side bike racks are good for short-term parking, longer periods of time, including anywhere from a couple hours to a couple months, will require more secure bike accommodations.
An indoor bike storage space protects bikes from both weather conditions and thieves. It also provides a safe, convenient alternative for riders, who won't have to stress about finding a spot to keep their bike outdoors. And, because it’s located on the property, riders won't be forced to walk around outside, potentially feeling unsafe. This is especially true at night.
Because of these reasons, many people now consider a bike room to be a important amenity when looking for a place to live.
Additional Bike Room Benefits
Some other reasons to consider installing a bike room are because it:
- creates organization in your space
- promotes a green and healthy lifestyle
- can include financial benefits
Facility managers are often the people who have to deal with the clutter that bikes create. A bike room provides people with a designated space, so they’re far less likely to leave their bikes on stairways or attached to railings or signs around the property.
Cycling has many positive health benefits, and the ease of access to a safe storage space gives people another reason to start cycling.
In addition to this, supplying parking for green travel has a positive impact on the environment, and can help inspire people to make other green changes.
Another benefit of a bike room is that it can be a revenue builder in multiple different senses. You can make money from the bike room by charging a small monthly fee to allow people to park their bikes in the room. You will also increase goodwill with cyclists and make them more likely to reside in your space.
Lastly, it might be in your best interest to create a bike room because there could be a city ordinance that requires it. Depending on where you’re located, there could be laws you have to follow.
Ultimately, building a bike room is a large undertaking, but the positives greatly outweigh all potential negatives. The initial upfront cost may be high, but, if set up properly, there will be little maintenance needed afterwards, and the room will ultimately be profitable for your building.
What To Know Before Planning Your Bike Room
Before you begin designing your bike room, you should have some information ready. The two biggest things to know are the design specifics of your would-be room and how many bikes you plan on storing.
Design Specifics of Your Space:
- Room Dimensions
- Any Potential Obstacles
- Building Materials Used In Room
Number Of Racks of Space:
- Required Amount By Ordinances
- Creating Sufficient Storage Space
Room Dimensions
Ideally, when planning your room, you would have complete freedom over the size of your space and would be able to make the storage area as big as you need to fill your bike rack quota.
But often, this isn't the case, and you have to work in a pre-built space. In a situation like this, high-density bike storage options, such as multi-tiered racks or staggered vertical racks, are especially beneficial.
This is where knowing the exact dimensions of your space becomes critical, as it allows you to know what limits you have for rack options.
For example, each style of bike rack requires a certain amount of height clearance to fit properly. Vertical bike storage racks will need 8 feet of clearance, while multi-tier racks will need 9 feet.
For the width of the room, the smallest bike room size possible would be 8 feet wide, to accommodate a single row of vertical racks. This is because in addition to bike rack size, proper aisle sizes need to be taken into account. As different types of racks take up more space, and more rows are added, a larger room will be needed.
Another thing to keep in mind is that the shape of a room affects the number of bike racks you can install. A rectangular-shaped room will always be more effective than a circular one of relatively the same size.
Potential Obstacles
It's also important to know if there are any potential obstacles that could get in the way of bike racks or aisles in the room. This includes pipes, electrical wires, doors, lights, and windows. These factors will be important in determining the restricted areas in your room. Note that these obstructions do not need to be visible to affect the placement of racks; wires or pipes below the floor or behind walls should also be taken into account, as mounting to the floor or walls could be hindered by such factors.
Building Materials Used
And the last important thing to know about the design of your room is what the walls and floors will be made of. When mounting a rack, the best option will always be concrete. For horizontal racks, this will allow for either in-ground or surface mounting, and for vertical and multi-tiered bike storage, it allows the racks to be connected directly to a wall. Concrete offers the most stable and sturdy protection from theft and damage and is overall the best choice for a bike room.
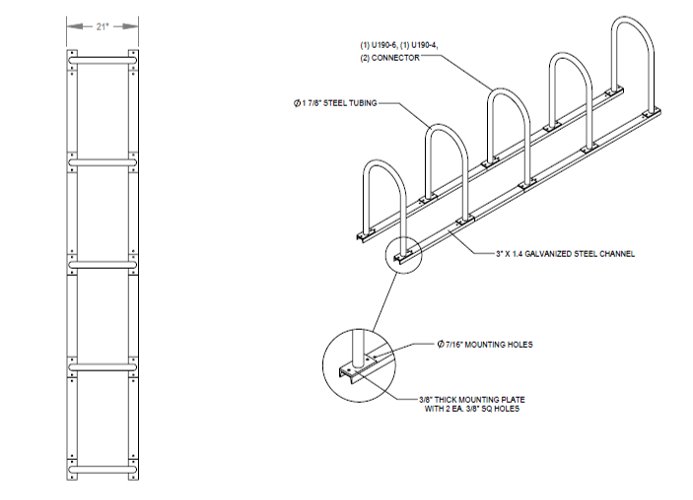
If your bike room is not made of concrete, however, there are still options for the types of racks you can use. Because surfaces such as wood, drywall, and asphalt are not as secure as concrete, they cannot be mounted to directly. Instead, channel-mounted racks could potentially be used, connected to the studs of a wall.
But, your best option in this situation would be freestanding racks, whose structure will typically be heavy enough to remain in place without needing to be secured to the ground. For horizontal storage, racks on rails are a great option for similar reasons.
Number Of Racks To Be Added
Typically, this number will be determined by one of two factors, either the regulations put in place by a local government, or by trying to accommodate as many people as you can in your space.
Before planning out your bike room, you should always check your local ordinances, including city, county, and state codes. Typically, there will be a minimum number of spaces required based on occupancy, square footage, or some other aspect. Certain ordinances can also dictate the amount of ground mounted bike racks a room must have. You can use library.municode.com to learn the specific ordinances of your area.
If there are no ordinances requiring a certain number of indoor bike storage spots, we suggest following the APBP recommendations for your bike storage room.
For office buildings the guideline is 1 bike storage space for every 10,000 square feet of floor area.
For buildings with multi-family bike storage, plan on a half space of bike storage for every bedroom.
For Health care buildings and hospitals there should be either one and a half spaces for every 20 employees or one space for every 50,000 square feet of floor area. Whichever is greater.
Public elementary, junior high and high schools should have one and half spaces for every 10 employees, plus one and half spaces for every 20 students of planned capacity.
For colleges and universities, one and a half spaces for every 10 employees are needed, plus one space for every 10 students of the planned capacity. Or one space for every 20,000 square feet of floor area. Whichever is greater.
Now that we’ve gone over some important things you need to know before beginning your design plan, let’s take a look at how to make the design process infinitely easier!
The Bike Room Builder
The Bike Room Builder is a revolutionary tool that allows you to design your own custom bike room in minutes. Choose from our wide range of bike storage products to create a 3D model of your dream bike room simply by dragging and dropping components into place.
To access the Bike Room Builder, sign into your free Madrax account and either click on the link on our home page or select the “See In Bike Room” option on any of our bike storage products.
From there you can be up and running in minutes without needing any special skills or knowledge of design software. If at any point you need help or want to learn more, you can either go to our “How To” guide on our website or contact our team for help!
Creating in the Bike Room Builder
You can create a bike room to your exact dimensions and see the space in both 2D and 3D views. This includes rooms that have unique shapes or curved walls. You can add, remove, or re-size the walls of your room with a simple click of your mouse.
Then, you can add obstacles into your space, such as doors, windows, and pillars. By adding these directly into the room, you can find racks that can accommodate these limitations.
Once the shell of your space has been created, you can begin to experiment with bike racks.
The easy-to-use interface makes it simple for you to add racks, amenities, and security options. Test out ideas, see what works best for your space, and place different types of racks next to each other. If you don’t like something, you can simply remove it from the room with a single click!
You don’t have to worry about putting bike racks too closely together, as all products in the builder have collision boxes that adhere to minimum spacing requirements, saving you the time, energy, and stress of spacing racks apart!
You'll be able to customize the racks by choosing their colors and components! You can view all of these adjustments from either a 2D top-down view or from inside the room in 3D.
Once you’re done, you can get a summary of your design, get a quote for your creation, and purchase the entire order in one big list. You can also share your project with others, or save your work-in-progress on our website so you can return to it later!
Useful Bike Room Tips
Creating Aisles
One of the most important aspects in setting up a bike room is ensuring that bike racks are spaced out correctly. In addition to making sure there is enough space between racks, you will need to ensure that you leave enough space for an aisle.
There should be 60 inches of aisle space beyond the tire of a bicycle parked horizontally. This should be measured to the tire of another bicycle or a wall, depending on your layout. When laying out racks in the Bike Room Builder, the collision box for each rack will include half of the space needed for an aisle.
Racks on Rails
In general, one option that can make spacing bike racks easier is getting bike racks on rails. Racks on rails have pre-placed spacing and parking spaces do not need to be measured out. You would still need to know the spacing requirements for aisles, but in high-density applications, racks on rails could be a cost-saving measure because it would eliminate labor hours needed during installation.
Vertical Racks
Vertical bike racks should provide bikes with at least 8 inches of clearance from the ground.
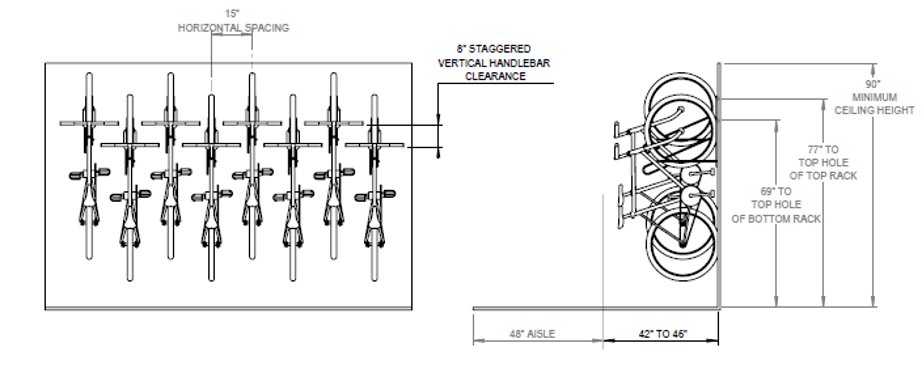
The center of a rack should also be placed at least 15 inches away from a perpendicular wall. This provides enough clearance for standard size handlebars to fit next to the wall.
When trying to maximize space for vertical racks, it's important that the height of each rack be staggered. If vertical bike racks are all mounted at the same height, they will need to be spaced at least 24 inches apart, versus just 15 inches when staggered. This is done to prevent handlebars from making the racks unusable.
After you have properly spaced your vertical bike racks, you will need to account for an aisle behind the stored bicycle. This aisle offers enough room to raise and lower bicycles onto the rack. A standard, full-sized bicycle from tire to seat is roughly 48 inches. You will then need an additional 48 inches to create aisle space beyond this, which should remain completely clear. So, in total, 96 inches of clearance are needed to use a vertical bike rack effectively. In addition to this you will need 8 feet of ceiling clearance, as mentioned earlier.
Two-tier Bike Racks
Two-tier bike racks typically come as complete units, so, similar to racks on rails, you won't have to worry about horizontal or vertical spacing. You will, however, need to factor for aisle space beyond the rack. This, again, should be at least 48 inches. As mentioned earlier, you will also, generally, need 9 feet of clearance measured from the ground to the ceiling.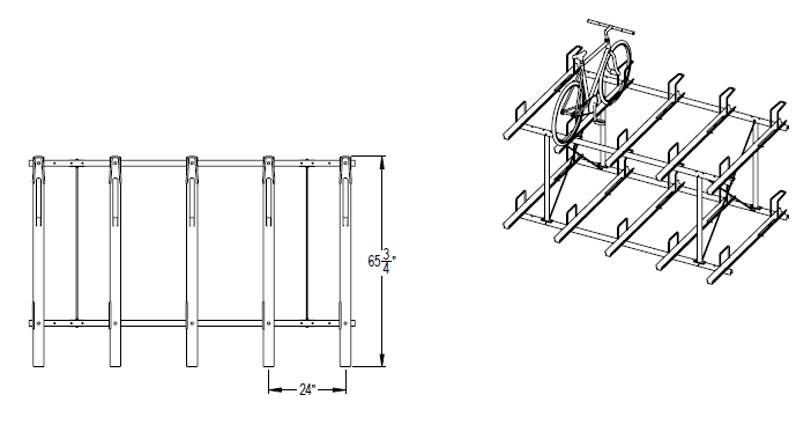
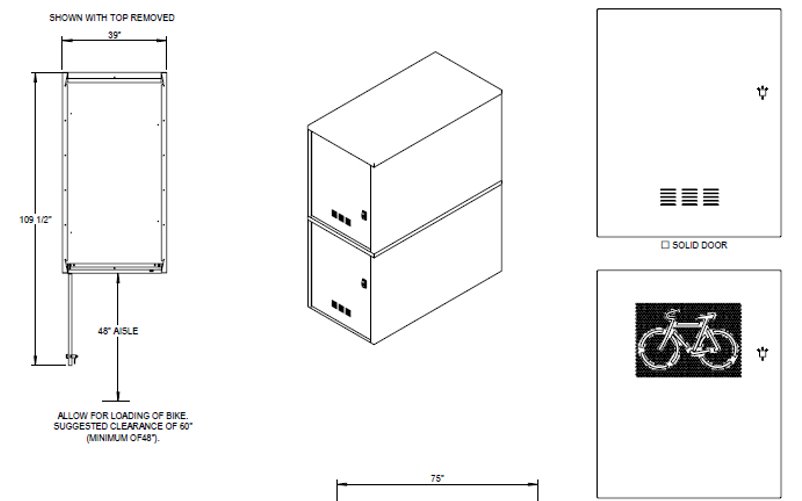
Bike Lockers
Bike lockers, by design, are relatively modular and are meant to be banked next to one another. The one spacing item to be aware of is the aisle between two facing lockers or between a locker door and a wall. This is measured based on when the door is completely open. Depending on the size of bike locker, the door can range from about 30 inches to 40 inches in size. Along with a 48 inches aisle, you would need a distance of 78 inches to 88 inches between the locker unit and a wall or open door of another locker.
When placing bike racks, keep in mind that these measurements are recommendations meant to provide general guidance for your layout. They could change depending on the specific bike rack you use or your building codes. Make sure to use the installation instructions to see if there are any exceptions!
Bike Room Layout Designs
Incorporate different styles of racks into your design based on how you anticipate the space being used. Doing so will allow you to maximize the number of bikes you can keep in your space at once while still accommodating the needs of your patrons. For example, if you’re installing a bike room for an elderly community, you may not want to include racks that force people to lift bikes into the air.
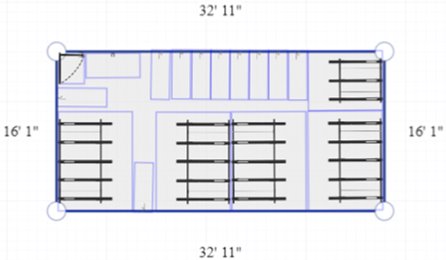
Easy Of Use Layout
If you expect tenants to be more active in their cycling, consider the value of a user-friendly layout. This would include ground-mounted bike racks, adequate clearance around the rack, and prominent aisles.
The additional space around and between racks gives users more room to maneuver within the bike storage area. It's also easier to access and lock the bicycle from the side. Additionally, floor-mounted bike racks don't require lifting to store the bicycle.
This type of design works well for commuters who rely on their bike to be a primary mode of transportation. They will appreciate the ease in accessing and returning their bike to storage. This type of layout also reduces the chance that bicycles will bump into each other while being stored or removed from the space.
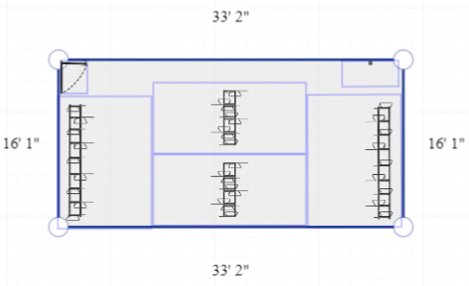
High-Density Layout
A high-density bike storage design provides the greatest number of spaces to store bicycles in the allotted area, while also adhering to ordinances and best practices. This layout style includes vertical bicycle parking, two-tiered bike racks, and reduced spacing between racks.
To create the greatest number of spaces for bicycle storage, you'll most likely incorporate vertical and two-tiered bike racks along walls and in open areas. For buildings with bike storage requirements that restrict vertical bike parking, high-density ground mounted bike racks can be used to store the most bicycles.
While this type of layout does store a greater number of bicycles, it also makes the area more congested, which could make it difficult for multiple users to access their bikes at the same time. On the one hand, the area is beneficial for those who just want a spot to store their bicycle, but it is less-than-desirable for those who plan to regularly use the area.
Balanced Layout
Another option is to blend high-density and user-friendly designs into a balanced layout. Here you would fill part of the area with high-density bike racks, while placing more user-friendly racks in the other portion. This will serve cyclists who ride on a regular basis as well as those whose main concern is just having a space to store their bicycle.
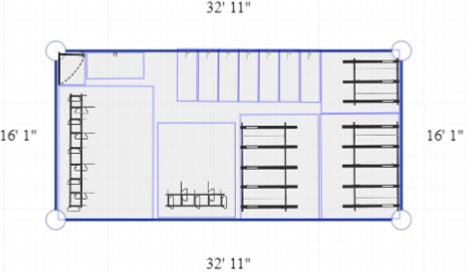
Adding amenities, such as repair and tire filling stations, as well as benches and lockers, can go a long way in making your bike room feel complete.
Related Resources
- [Article/Video] Comparing High Density Bike Racks
- [Article] Our Most Effective Bicycle Storage Racks
- [Article] Bike Storage Requirements
